With the corner posts securely in place, the fence begins to take shape with the addition of horizontal rails. This stage is when precision matters most to ensure a strong, stable structure.
This is also the time to be sure your project adheres to local regulations and property boundaries. Obtaining a copy of your home plat map is always helpful to determine these parameters. Contact Fence Installation Lansing MI now!
As Alexander Graham Bell famously said, “preparation is the key to success.” That’s especially true when it comes to fence installation. Taking the time to understand the process can help prevent a host of issues, from costly mistakes to frustrating delays.
The first step in the preparation process is assessing the property’s terrain and property boundaries. This will inform many of the decisions made moving forward and help to avoid common pitfalls. This assessment should also consider factors like the intended purpose of the fence, as well as local regulations and restrictions.
Once the property has been adequately assessed, the next step is preparing the area for the fence installation. This includes clearing the area of any debris or existing structures. It’s also important to check for buried utility lines. This will ensure that the fencing crew doesn’t accidentally damage any underground pipes or other infrastructure. The final preparation step is to dig the post holes. This is an important step, as it helps to ensure that the posts are securely set and aligned according to the planned layout of the fence.
Properly digging the holes is vital to ensuring that the fence will be sturdy and long-lasting. The depth of the hole should be at least one-third to one-half the height of the fence, depending on the soil type. Using a power auger or other tools can help speed up the process and ensure that the holes are properly deepened.
Once the posts have been dug, it’s a good idea to add some gravel to the bottom of each hole. This will allow water to drain away from the posts during inclement weather, which will help extend their lifespan. The gravel can be any size, but pea-sized landscaping gravel is typically the most cost-effective and effective option.
Post Installation
Fences define property lines, maintain security and privacy, keep pets and children safe, and keep predators out. Fence installation is a major investment, and it’s important to know what to look out for during the process to avoid common mistakes that can reduce longevity and functionality.
When it comes to installing a wood fence, the first step is securing the posts that will form the cornerstone of your structure. The posts should be firmly set into the ground, and they need to be able to hold the weight of your choice of rails, panels, or pickets. If the posts are not anchored properly, the entire fence will be susceptible to structural damage and potential accidents.
It’s also important to note that some communities require a building permit for fence construction, and they may have rules about where you can place your new fence. It’s best to contact your local homeowner association or municipality to discuss codes, restrictions, and permit requirements before starting the work.
Once you’ve located the locations for your fence posts, dig holes that are twice the diameter of each post and one-third of the height to ensure you can seat it properly and securely. Consider using a power auger to speed up the digging process and make holes more uniform. When you’re ready to seat the post, use a level to check that it is straight and parallel with the bottom of the hole.
After the foundational posts are in place, it’s time to install the horizontal rails that will support the panels and planks. The level will come in handy once again to guarantee that the rails are uniformly spaced, allowing for expansion and contraction due to temperature and humidity changes.
When it comes to the rails, choose from a variety of finishes to match your style preferences. A basic, galvanized metal option will provide durable functionality, but you can add a decorative touch with vinyl fencing to enhance the aesthetics of your home. After the rails are in place, it’s time to attach the panels and planks.
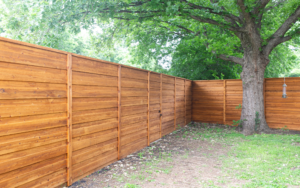
Rails & Panels
Once the posts have been set, it’s time to add the rails and panels that will create the “wall” that keeps out intruders and blocks sightlines. This is where the fence begins to take shape and can really make a difference in the final appearance of your home’s yard.
Professionals use quality wood to build fence rails, which provide the structure that will hold your slats (fence boards). The best choice is cedar or redwood, as both are naturally resistant to insect damage and decay. Regardless of the type of wood you choose, it’s important that it be treated to protect against the elements and prolong the life of your new fence.
Before installing any fence rails, professionals backfill any holes in the ground, using a mixture of gravel and concrete to ensure the post will stay stable and secure over time. They also grade the soil to ensure proper drainage away from the fence, preventing water pooling and potential moisture damage.
After the rails are in place, professionals can install any additional fence accessories you may want to include. These might include decorative trim pieces or gates to allow you to control who has access to your property.
Another common accessory is a lattice top or “topper” that adds visual interest to your fence and can help prevent children and pets from escaping the yard or smaller animals from climbing the fence. This decorative element can be constructed in many different styles, from a simple one-foot tall lattice to a more elaborate diagonal pattern that adds a beautiful accent to the yard.
If your fence design includes a middle rail, it should be placed about six inches above the bottom rail to prevent moisture damage and improve stability. The next step is to attach the fence slats to the rails, starting with the end posts. When slats are attached to the top and bottom rails, they should be securely fastened with galvanized screws or nails. When installing the slats, make sure that they are always facing outward, toward your yard. This helps to prevent sagging and provides more privacy, as well as complying with some strict building codes that require the good side of the slats to be displayed.
Final Touches
Once the posts are in place and the concrete is set, it’s time for the fence to start taking shape. This step is when the fence rails and panels or slats are attached to the posts, creating a sturdy frame for the fence and setting the foundation for the finished product.
The first task in this phase is to inspect the site and clear it of any obstructions, such as rocks, trees, or existing structures that might interfere with the construction process. It’s also a good idea to have underground utility lines checked before beginning construction, which will help prevent damage to water, gas, or electrical lines during digging.
Next, use stakes and string to mark the exact path of the fence line. This will help to ensure that the fence stays within your property boundaries, and it will also make it easier to visualize the finished product. Once the fence line is clearly marked, it’s important to maintain consistent spacing between posts so that the structure remains uniform and strong.
Fence installation should be performed during the summer, when weather is typically warm and dry. This will make the work easier and more comfortable, and it will minimize the risk of accidents caused by slippery or icy surfaces.
Once the fence is constructed, it’s a good idea to apply a finish, such as paint, stain, or sealant. This will protect the wood against moisture and UV rays, which can cause deterioration and fading over time. It’s recommended to reapply the finish as needed, typically every few years or whenever it starts to look dull.
Finally, it’s a good idea to plant flowers or shrubs along the fence line to soften its appearance and integrate it into the landscape. In addition, it’s a good idea to perform regular inspections of the fence to check for any signs of damage or rot. Addressing any issues promptly can save you a lot of time and money in the long run. By following these simple tips, you can enjoy a wood privacy fence that looks great and lasts for years to come.